

To kick off 5 Days of Felt, I'm sharing this ruffly rosette wreath that I made for my sister's house. I came across the tutorial for the rosette wreath at Domestifluff awhile ago and had been wanting to try it. I also wanted to decorate my sister's house for Christmas since my little nephew had just been born and she was a little busy with the whole newborn thing.
Please forgive the car seat backdrop. My car was the only place with good light. This is the wreath in route to my sister's house. You might be thinking pink?, that's not a traditional Christmas color. But my sister = not so traditional, just one of the many reasons I love her!

Now let me show you how to make it. You'll need:
- 12" styrofoam wreath
- about 2 yards felt (maybe a little less)
- a box of 200 straight pins
- 3" circle template
- pen
The first step is to cut a 3" circle template from some cardstock. Then get to tracing! I started with the 9"x12" sheets of felt. I could fit 10 circles on one sheet. I ended up running out of sheets of felt so I headed back to the store and then bought a yard of felt in the same color. That's why I'm not sure exactly how much felt you need total. I do however know that I cut out 168 circles. That's right, I counted. I only covered the front and sides of the wreath so that it would lay flush with the wall. If you want to cover the back of the wreath as well, you will definitely need more circles.

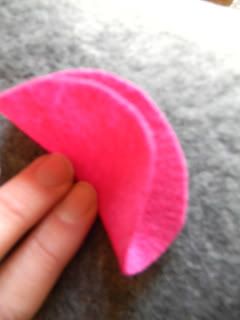
Once you have the circles cut out (that is the most time consuming part), it's time to start covering your wreath with ruffles. Take each circle, fold it in half and then half again. Push a straight pin through the bottom corner.
 | 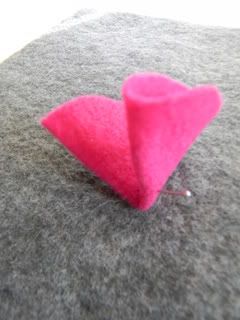 |
Then start pinning anywhere on the wreath. The beauty is that you can't really mess it up. There is no pattern for pinning the circles. Pin away!

Once I was finished, I attached a white ribbon to the back of the wreath to hang it on the wall.

I also cut out some holly leaves from blue felt and tied three jingle bells together for the berries. I used straight pins to stick the holly in as well.

Thanks for the idea Kristen! And Merry first Christmas to my little nephew Riot!
No comments:
Post a Comment
Let me know what you think. I'd love to hear from you!