
One of the many things I've learned from my mom -- always make your own Halloween costume and never spend a lot of money doing it. It's like a personal challenge every year to come up with a super sweet costume idea using things around the house and/or spending as little as possible.
For example, my owl costume from last year or my paper wig.
And of course my man gets just as into it as I do. He's got just as many creative juices, flowing through his veins, as I do. Have I mentioned we're a match made in heaven?

This year is another story. We've been so busy and exhausted lately. I mean, where did October go? We really hadn't planned anything for Halloween. Then Ryan came home from work the day before Halloween with some face paint and some rhinestones. "I'm going to make you a pretty little sugar skull," he said.
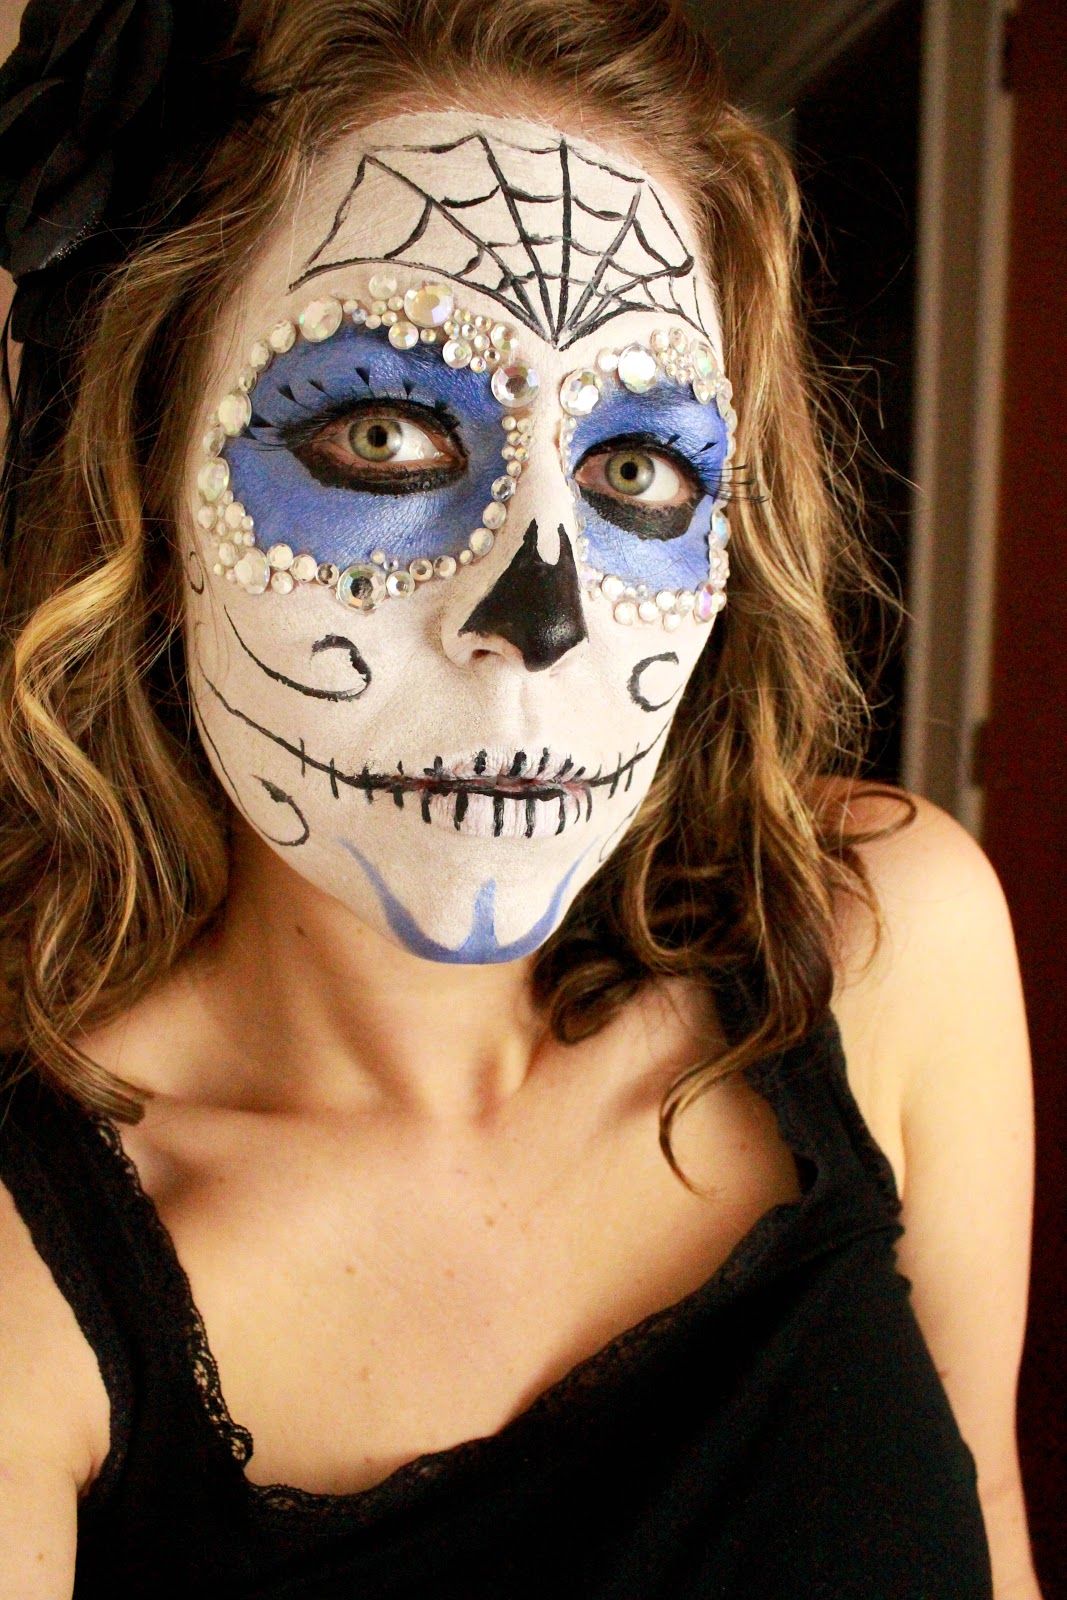
I've had this fabulous photo pinned of a beautiful girl with her face painted like a sugar skull from el Dia de Los Muertos (Day of the Dead). Ryan used her as the inspiration for what you see below. It's creepy, it's sparkly, it's awesome.

We got up earlier than usual so that he could paint and bedazzle my face before work. Unfortunately, not early enough to have time to take photos of each step as I had hoped. So I apologize for the lack of photos during the process, but I'll try to explain the steps as best I can.
What you'll need to paint your own sugar skull:
- white face paint
- face paint in a color of your choice
- fake rhinestones/gems
- eyelash glue
- black liquid eyeliner (I used M.A.C. Superslick Liquid Eyeliner)
- false eyelashes
- hair flower

That's right. This is me at 5:30 in the morning. Not a pretty sight. I wasn't cranky, despite how it may look. I was just preparing for my serious role as a Day of the Dead skull.
1. You'll want to wash your face first, just saying. Start by painting blue (or the accent color of your choice) around your eyes up to your eyebrows, leaving your eyelids and the space directly around your eye clear.
2. Cover the rest of your face with white, leaving a border around the blue for the rhinestones and space on the tip of your nose.

(This pic was taken at the end of the day after I took off the gems. But it shows the space you should leave.)


4. Use black liquid eyeliner to border the eyes and color the eyelids black. Color the tip of the nose black. Draw a spiderweb on the forehead, swirls on the cheek, and line the mouth with the eyeliner as well.
5. Draw design on chin with blue. Add false eyelashes (I used the feathered ones from last year's costume) and stick a flower in you hair.

6. Finally, admire the awesomeness in the mirror and creep yourself out, just a bit.

I dig it! And so did my students. What do you think?

Sharing this face paint tutorial over at 52 Mantels, Crafty Scrappy Happy, Whipperberry.
This looks awesome! You are so talented. I wish I could do something like this for Halloween, but I'm pretty sure mine would not turn out as pretty as yours!
ReplyDeleteoh my gosh, that looks amazing!
ReplyDeleteAmazing!! You and the hubs are both so talented! :)
ReplyDeleteI've pinned this for next year's inspiration. What a fun idea!
this looks amazing! so inspiring. great job!
ReplyDeleteAwesome! I was inspired by the same photo on pinterest and did something similar, but I switched out jewels for bindis and did it more sporadically. Yours is amazing. xo
ReplyDeleteHere's mine:
http://heymishka.com/2012/11/05/%E2%9D%A4-que-ni-la-muerte-nos-separe-%E2%9D%A4/
Happy November!
xx